Free Graphic Novels (DC, Marvel, Image, etc), Music, TV shows, and music on HOOPLA.
Free music that you can KEEP on FREEGAL
You are PAYING for all this with your tax money – USE THEM. Most likely systems will have all 3 or 2 out of 3, so if you aren’t sure call your local library’s reference/information desk and how you can get set-up or started.
Salt itself is excellent for protection and purification. Black salt is usually used to banish and protect against negative and unwanted energy. It can be used to protect your home by sprinkling it around the property line/perimeter, removing negative energy from objects, placing it in the corners of a room, or across doorways/windowsills. It can be used in protection spells and to break curses/hexes.
It’s very easy (and fun) to make black salt. You can use:
Charcoal
Black pepper
Scrapings from the bottom of a cast iron pot or cauldron
Ashes (from a bonfire, incense, etc)
Black food coloring
Grind the blackening agent you’ve chosen into a powder. Beware of the dust from this. Once you’re satisfied with the consistency, combine it with salt (table salt or sea salt are both great). The amount of salt is up to you, but it’s good to use roughly double the amount of salt.
As you combine the salt and powder, think of all of the things you wish to protect, negativity you want to drive away and visualize positive energy flowing through the salt. You can chant as you grind the ingredients and mix them with the salt.
Various uses for black salt:
keep it in a pouch under your pillow to keep away nightmares and unwanted energies
place it across doorways and windowsills to keep away negativity, to avoid unwanted company
add a small amount to bath water if you’re feeling especially depressed, angry, negative, etc
wear it in a locket, sachet, bottle, etc
keep it in a bowl or bottle for general protection around your home
add some to protection jars, charms and bottles
use to symbolize the waning moon, new moon and eclipses
use in work associated with fire energy, masculine energy, darker deities, war deities, Crone goddesses/aspects
cleanse tools in a bath of black salt and water (make sure salt water will not damage metals/materials/crystals)
sprinkle liberally on items or possessions that you feel have bad memories or attachments to them
sprinkle in the footsteps or path of an enemy/unwanted person to repel them
can be used in curses and bindings
Notes:
Black salt absorbs negative energy and it’s best to dispose of it after use – bury it far from your home or toss it into a fire (OUTSIDE, do not inhale the smoke/fumes!!). It’s not for consumption. There is also pink Witch’s Salt, which is used for love, cleansing, healing, prosperity, abundance, peace, dreams, and lunar workings.
Glamours are a type of magic meant to change the way you are perceived by others. This can mean anything from making you seem more attractive, to more intimidating, to even letting you blend in with your surroundings. With all the different possible applications, this is the type of magic I have found to be the most useful
How They Work (Note: In my opinion. Yours may vary)
Imagine that there’s an aura of energy that surrounds you and is completely unique, like a signature. This energy acts like a filter for how people see you (as described in this post). Change the filter, and it will change the way others perceive you without actually changing your appearance at all.
This can be done a million different ways. I find it helpful to get familiar with your energy first. Meditate, and imagine what that energy around you might look like. What color is it? What texture? How much space does it take up? Once you have a good idea of what it looks like, it becomes a lot easier to manipulate.
How To Do Them
There are about as many different ways to do glamours as there are witches. Do some exploring to see what works for you. Do you like makeup? When you get dolled up, visualize the makeup going onto your energy. Are you a jewelry person? Push the energy you want to give off into the jewelry and wear it. I personally like to add a physical aspect to my glamours, but that’s not even necessary; you could simply imagine your energy changing in the way you want to.
Glamours generally stay on as long as you are putting energy into them. Most tend to go away as you stop thinking about them, but I have done glamours before that tapped into my energy for far too long and had to be consciously removed. If you find this happening, cleansing yourself and then grounding will usually do the trick.
Your aura is the energy field that surrounds you. It collects negative energy each day and if you do readings of any kind (like me) and you don’t cleanse your Aura there will be consequences. Keeping your aura clear and bright is very important and here’s how to do it:
Cleansing Aura
You can cleanse your aura in few, simple steps.
Find yourself a room, and 15 minutes of free time, give or take. Make sure no one will disturb you in the next 15 minutes.
Light a candle. The size and the color doesn’t matter. The fact that it is a source of open flame does matter :). When the candle is ready, stand in front of it.
Now, close your eyes and visualize a powerful, bright, spiritual light descending from the above, like a shower, flowing into you, and cleansing your aura of negative energies. Continue such visualization for the next minute.
When you’re done, open your eyes. Now, you’re going to grab the negative energies, and cast them into the fire of the candle. So use your hands, and slope to the front, so you can reach the floor. Then, intend to grab the negative energies with your hands, and grab/comb these energies from the floor up to your head. Then cast the energies into the fire with a proper gesture and intention in your mind. When the energies are cast into the fire, mark an X letter in the air, or a cross, with an intention of cutting yourself off the negative energies you just cast.
When you’re sloping, inhale. When you’re grabbing and combing the energies, exhale. The point is not to inhale the negative energies back into your body.
Continue the process of grabbing the energies around your entire aura. You can go clockwise, or counter-clockwise. Personally, I cleanse the energies from the front, from left, from right, and from the back, and I’m done.
When you’re done with grabbing, pick up the candle. And comb your aura with it, from the bottom to top, all around you. The fire will be an additional method of cleansing aura.
And when you’re done, intend to cut yourself from the negative energies, and from the candle. Then, put out the candle, gently. And you’re done.
As promised, and requested, a bottle sealing post!
A important reminder first– be careful when you’re using candles, don’t set your shit on fire. You can use any candle for this, I use different candles (colors and scents) depending on what I associate with the bottle I’m making (yellow & lemon for happiness, blue for sleep, etc.) you don’t have to do this, but you can. You can also use regular candles instead on tea lights, but tea lights usually melt faster for me.
Also, I don’t know (or actually care?) if this is the proper way to seal a bottle with wax, witchcraft doesn’t need to be fancy, and my personal craft is focused on using what I already have, and going out to purchase “special” items as little as possible, nothing wrong if you do, but I am a very small budget witch, and I like the challenge that comes with it. I happen to be a bit candle crazy, so this works well for me.
Okay, so here we go!
Set down a piece of paper if you don’t want to get wax on your stuff, light that little tea candle (or regular candle) and let it start to melt. I usually light my candle before I start putting together my bottle, so it is usually close to ready by the time I’m done.
Once the tea light is melted all the way (or big candle, deep enough to dip) I dip the top in! If you are using a bigger bottle than I am, you can remove the wick usually with a pair of tweezers, but I don’t like to do this because I never use all the wax, so it’s a waste if I take out the wick!
Pull it out, you can blow on it to help it cool faster, dip it again, out, blow on it, a few times until it’s pretty covered and the top is pretty solidly covered (pictured is after the first dip! But you can see how covered it was when I start pouring wax in the next photo)
If you want the drippy-witchy-wax look, (carefully) pick up your candle and pour wax over the bottle top (see why we put that paper down, now?) I usually smooth out the top with my thumb, gently while it’s cooling down. Once cooled down the wax on the paper usually comes right up, and I usually stick it back in the candle to melt down for later.
Usually I stick mine in the fridge to cool down and harden (my house is warm bc we don’t control the heat)
And ta-da! Your bottle is sealed up. Also, I think you could probably carve a sigil in the top if you’re into sigils (I don’t personally use them, but I imagine you could!)
There we go, it’s super easy, no one taught me how, I just sat down and was like “OKAY, so how am I going to seal this without covering the whole damn bottle in wax????” and this is what I came up with! If you don’t want whatever is in your jar to move around (I usually pack mine pretty tight, so it’s okay) I would just pour the wax on top, it will be messier though.
If anyone has any questions, feel free to shoot them over my way!
Have a beautiful day, babies. I hope this was helpful!
– a post for the anti-anxiety bottle pictured here is coming soon! –
The ‘proper” way to seal a bottle or jar with wax is However It Works Best For You. 🙂
(Tbh, I kind of like the tealight method pictured here a little better than my usual method of dripping wax from a small taper until the thing is sealed. Different techniques, same goal.)
Just use a wax burner that you out scented pucks into the top. That way your fingers stay safe and if you drop it in the wax its easy to fish out. I mean, the tea light works too but if you dont wanna dick around near an open flame, my option is a tiny bit easier
I was thinking about it earlier and I would have totally been using my wax warmer if it hadn’t shorted out on me! Still be careful, those things get hot af also!
When giving advise to beginner practitioners sometimes we forget to stop and explain what it means to even program a crystal. In short, You are infusing it with intention. A Goal, A Desire. You are infusing a crystal to amplify that intention and desire, And to hopefully achieve it.
The way you do this is simple.
1. Cleanse your Crystal – This is the most important step. Cleanse. Your. Crystal. Yourself. Use herb smoke, Energy work, Sunlight, Moonlight, Prayer, What ever works for YOU.
2. Cleanse Yourself – This is equally as important as cleansing your crystal because you want to be in a clear calm state. You don’t want any outside forces influencing your work.
3. Once you are clear with your intention and desire hold your crystal in your hands. Visualize what you want, Speak aloud or in your thoughts. Be Clear. Be repetitive. Feel it.
4. Feel the energy and warmth leaving your hands, And entering the crystal. Make it yours, And fill it with your desire.
5. Continue these steps until you feel the crystal has fully absorbed all the vibrational energy.
That’s all! The crystal will now hold your intention, And will amplify your attract your desire.
(To reverse this process, Do the same steps with intention of cleansing and release the energy.)
For that matter, you don’t need a charcoal burner, tongs, sand, or the willingness to handle something that sparks and burns dangerously hot. You don’t need any of the things that every website insists you need to burn resin, herbs, or loose/granular incense mixes.
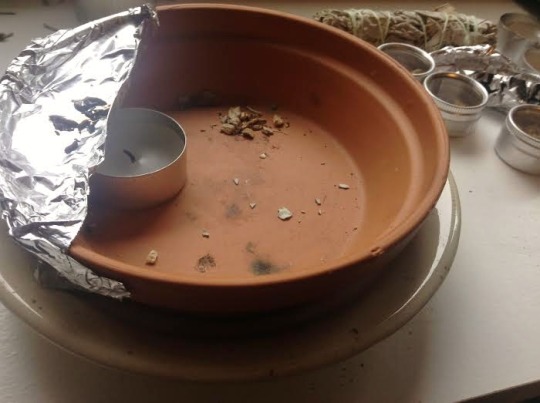
All you need is a tea light, aluminium foil, and a shallow (fire safe) dish.
Drape the aluminium foil over part of the dish and pinch around the rim so it stays securely in place. Turn up the inner edge or dent it a bit if you’re working with resins that liquefy when they heat up. Put the resin/herbs on the foil. Light a tealight and set it so the flame touches the foil (it doesn’t have to be completely underneath). Done!
My setup looks like this:
If you want, keep delicate herbs further away from the flame so they don’t burn until they’re acrid. Try to avoid touching the foil because it conducts a lot of heat, though I’ve never gotten an actual burn from it. Most herbs you can just brush off when you’re done and reuse the foil. If you’re using resin, some residue will probably remain after several uses and you might want to replace it if you don’t want a slight undercurrent of frankincense or whatever next time (or keep that piece of foil reserved for that specific resin).
This cost me nothing. It’s sturdy and I can’t knock it over accidentally. It’s not as smoky as charcoal methods because it doesn’t burn as hot, and if you arrange things right you can get scent with no smoke which is great if you’re concerned about smoke inhalation. I can just blow it out when I’m done. It doesn’t get the nasty smell that people complain about with self-igniting charcoal. Resins last a long time because they are heated gently and just ooze, solidify, and ooze again when reheated. It’s not as pretty as fancy burners but it’s safe, fast, and functional.
I never see methods recommended that don’t use charcoal, and charcoal burning just isn’t accessible for me. Hope this helps others having similar issues.




 Banette in the Making's tumblr back up